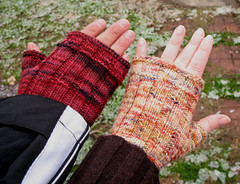
These mitts first made their appearance on a great camping and hiking trip to Alaska two summers ago.
I said I would write up the pattern, and I finally got around to it. The ribbing pattern sets off hand-dyed yarn very nicely, while the garter stitch rows add a bit of structure to the mitt shape.
These are especially good gloves for Texas, since they keep the chill off but don’t make your hands too warm. And if you work in a drafty office, these are the perfect accessory as you can still type and make paper clip soldiers while wearing these babies.
This is my first free pattern, please let me know if you run into any snags or if I could make it more clear or concise. Also, the pattern is copyrighted by yours truly which means you can make as many of these as you want, but please don’t sell the finished mitts or any copies of this pattern without asking my permission first. Thank you! And of course: if you do make these, please let me know!
Ribbed Fingerless Mitts
One Size (with adjustable length)
Yarn:
Any superwash DK/Sport yarn will work well for these. In the samples shown, hers were made with Koigu Kersti and his were made with Spirit Trail Fiberworks superwash DK/Sport sock yarn.
Each pair takes just over 50 gms of DK wool to complete (or 125-150yds).
Needles: (2) US 3 circular needles (or size needed to make gauge)
Notions:
Scrap yarn
Tapestry needle
Gauge:
26 x 40 = 10” (40 cm) square
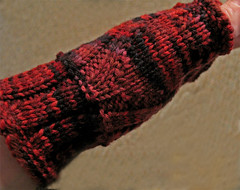
Ribbing pattern:
Row 1: K3, P2 to end of round
Repeat row 1 for 3x2 ribbing.
Abbreviations:
Kfb – Knit into the front and back of the next stitch
Pfkb – Purl into the front then bring the working yarn to the back of the needle and knit into the back of the next stitch.
(Make 2)
Body:
CO 50 stitches, join being careful not to twist stitches.
Row 1: Purl. Row 2: Knit 1. Repeat rows 1 and 2 once.
Begin 3x2 ribbing and continue until cuff measures 2”.
Knit 1 round. Purl 1 round. Knit 1 round.
Continue in 3x2 ribbing for 2 rounds.
Begin thumb gusset:
At the beginning of the next round, (Round 1)Kfb into the first stitch, PM, K2, P2, then continue in 3x2 ribbing to last stitch, then PM, Pfkb. Next round (Round 2), knit all increased stitches, and maintain 3x2 ribbing for the rest of the round.
Detail of thumb increases
Continue to add gusset stitches as follows: Round 1: knit to one stitch before marker, Kfb, slip M, K2, P2 continue in 3x2 rib to next marker, slip marker, Pfkb, K to end of round. Round 2: knit all increased stitches and maintain 3x2 ribbing for the rest of the round. Repeat Rows 1 & 2 until there are 19 gusset stitches.
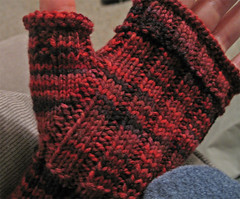
Detail of back thumb shaping
On the next round, continue in pattern to the second stitch marker, remove marker, P1, then slip all thumb stitches onto a piece of scrap yarn. CO 1 stitch using the backward loop method before beginning the next round. K2, P2, continue in 3x2 ribbing to end of round. Knit the last stitch of the round (this becomes the first stitch of the 3x2 ribbing pattern).
Continue in 3x2 ribbing until mitt measures approximately 5 ¼” (or approximately ¾" shorter than you want the final mitt). Knit 1 round. Purl 1 round. Knit one round. Next round, resume 3x2 ribbing for 5 rounds. K1 round. P 1 round. Bind off loosely using a sewn cast off. (Instructions here.) Complete thumb.
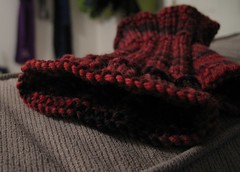
Detail of sewn cast off.
Thumb:
Pick up and knit two stitches across the join (20 stitches). Continue in 3x2 ribbing for 5 rounds. K 1 round. P 1 round. Bind off thumb stitches using sewn cast off.
No comments:
Post a Comment